Article index:
- 1 – Pillow Installation
- 2 – Pillow Version
- 3 – Image Loading and Saving
- 4 – Reading the pixels
- 5 – Image Processing
- 6 – Image Processing Operations
- 7 – Adding a watermark
7 – Adding a watermark
ImageDraw and ImageFont give to Pillow the capability to write text on an image as well as to draw lines or points. Here is a code snippet that shows how to add a watermark (a cross and the GLSL Hacker string) to a Pillow image.
from PIL import Image
from PIL import ImageFilter
from PIL import ImageOps
from PIL import ImageDraw
from PIL import ImageFont

# The demo folder
demo_dir = moon3d.getDemoDir()

imageW = 0
imageH = 0
img_filename = "%s/../data/tarte_fruits.jpg" % demo_dir
font_filename = "%s/timR24.pil" % demo_dir
im = None
ft = ImageFont.load(font_filename)

im0 = Image.open(img_filename)
imageW = im0.size[0]
imageH = im0.size[1]

im = ImageOps.solarize(im0, 128)

draw = ImageDraw.Draw(im)
draw.line((0, 0) + im.size, fill=(255, 255, 255))
draw.line((0, im.size[1], im.size[0], 0), fill=(255, 255, 255))
wh = ft.getsize("GLSL Hacker")
draw.text((im.size[0]/2 - wh[0]/2, im.size[1]/2 + 20), "GLSL Hacker",
  fill=(255, 255, 0), font=ft)
draw.text((im.size[0]/2 - wh[0]/2, im.size[1]/2 - 60), "GLSL Hacker",
  fill=(255, 255, 0), font=ft)
del draw

tex01 = moon3d.image.create2dRgbU8(imageW, imageH)
moon3d.image.updatePixmap(tex01, im.tostring())
This demo uses the timR24.pil file. This is actually a font descriptor and the real font bitmap is located in the timR24.pbm file. A zip archive with several fonts is available in the demo folder but you can download the latest version of the font archive HERE.
The full demo is available in moon3d/gl-210-python-pil-pillow/pillow_watermark.xml. Just load it in GLSL Hacker and you should get:
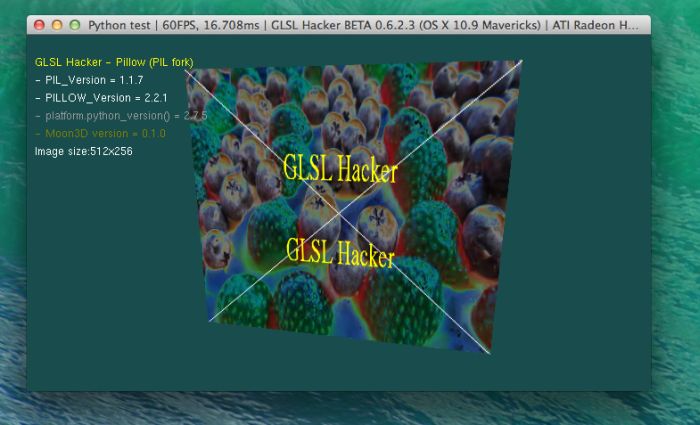
ImageOps.solarize() + watermark