
Test summary:
1 – R5770 Hawk Overview
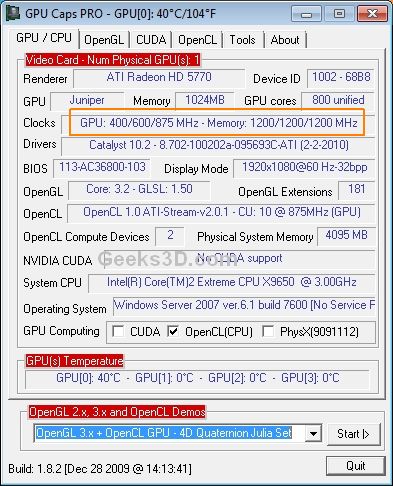
MSI’s R5770 Hawk is a factory overclocked graphics card: the GPU (Juniper) is clocked at 875MHz (reference board = 850MHz) while the memory keeps the reference clock (1200MHz).
R5770 Hawk official page with complete description and specifications can be found HERE.


Memory chip detail
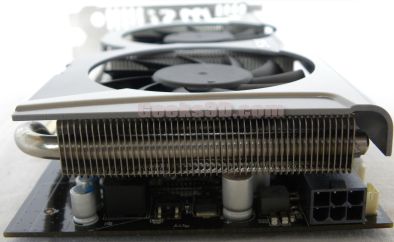
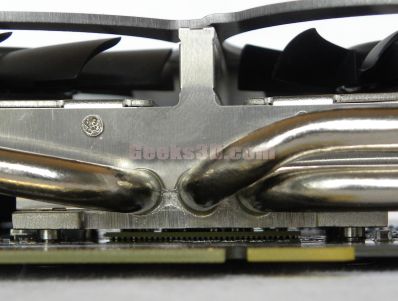
MSI has done a very good job on the VGA cooler part. The Twin Frozr II is able to chill the GPU very efficiently with an extremely low noise even under heavy load! My ears are very sensitive and even a Zalman VF1000 VGA cooler is too noisy for me. But I can work without any problem near the R5770 Hawk. Nice job!
2 – R5770 Hawk V-Check Points
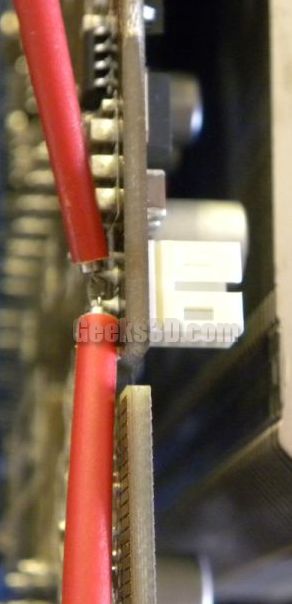
One interesting feature of MSI’s cards (Hawk and Lightning series) is the presence of built-in voltage measurement points called V-Check points. There are two V-Check points: one for the GPU and one for the memory. Since MSI didn’t send me the additional cables to connect a multimeter to the card, I used very small clips connected in the back face of the PCB. Fortunately V-Check points connexions are enough long on the back face to allow this kind of hack:
GPU V-Check point
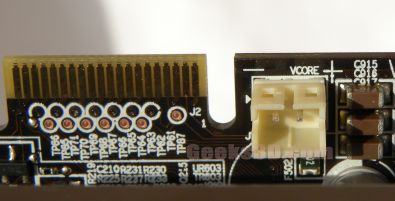
GPU V-Check point detail
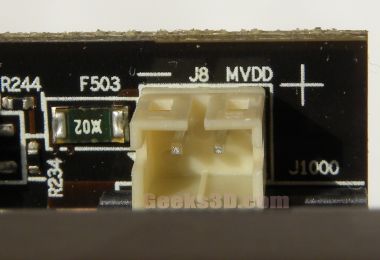
Memory V-Check point detail
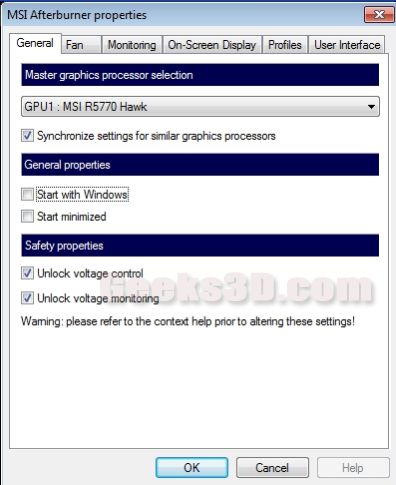
With MSI Afterburner, you can modify the GPU voltage (GPU voltage control is disabled by default). Depending on your GPU overclocking, you must modify the GPU voltage to ensure a stable work of your graphics card. To reach the max GPU clock you have to increase the GPU voltage to the max…
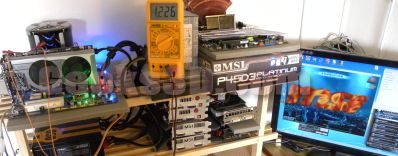
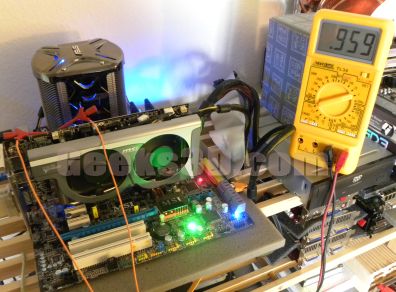
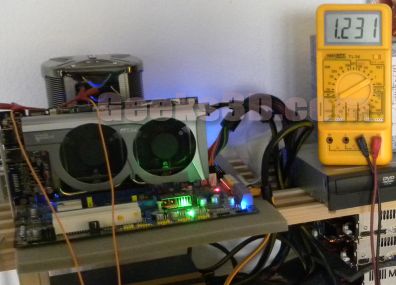
Okay, let’s see what a multimeter says when it’s connected to the GPU v-check point of the R5770 Hawk.
In idle mode, the GPU core voltage is 0.959V:
Under heavy load with MSI Kombustor (1920×1024 fullscreen), the GPU voltage automatically reaches 1.231V:
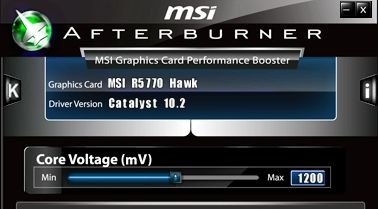
As you can see, Afterburner does not display the exact value of the GPU voltage: there is a difference of around 0.02V (0.031V in the picture). Small difference but for some overclockers it’s important.
The GPU voltage is adjusted depending on the required graphics load. For example with Kombustor in 1024×768 windowed mode, the GPU voltage is set to 1.226V:
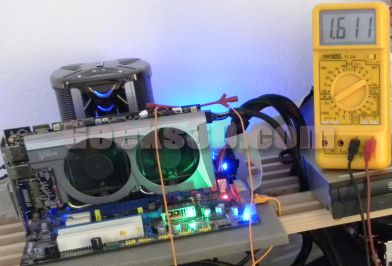
On the other hand, memory voltage does not vary and is always around of 1.610V:
3 – R5770 Hawk Overclocking
To overclock the R5770 Hawk, I used the same method I described in this tutorial. But this time, instead of using FurMark and RivaTuner, I used MSI’s overclocking tools: Afterburner and Kombustor. Afterburner is a customized version of RivaTUner and Kombustor is a customized version of FurMark.
You can download Afterburner and Kombustor in the same Zip archive HERE @ MSI.
The R5770 does not display nice artifacts like the GeForce GTS 250. When clock limits are reached, either the system freezes or the full screen (the desktop) displays artifacts (flicking image). For example I got this screen when memory clock was a little bit too high:

MSI R5770 Hawk – zoom on a memory artifact…
Hum… looks like the GSoD… 😉
Here is the GPU Caps Viewer screenshot of the Hawk with default clocks:
Here is the bench test configuration:
– CPU: Intel Core 2 Extreme X9650 @ 3GHz
– Mobo: MSI P45D3 Platinium
– Windows 7 64-bit
– RAM: Patriot Sector 5 2x2GB DDR3 1333MHz – default clocks
– PSU: Antec TruePower Quattro 850W
In idle mode, the total power consumption of the system is 100W.
To measure overclocking gains, I did two benchmarks with Kombustor:
1 – 1024×768, windowed mode, 60 sec, no MSAA.
2 – 1920×1080, fullscreen, 60 sec, no MSAA.
With R5770 Hawk default clocks, here are the results:
1 – 1024×768: 3026 points
2 – 1920×1080: 1503 point
With default clocks, the total power consumption of the system is 200W (1920×1080 fullscreen).
After overclocking tests, I found these stable overclocking settings:
– GPU core: 960 MHz (+ 85MHz)
– Memory: 1370 MHz (+ 170MHz)
With overcloking settings, the power consumption is 210W (1920×1080 fullscreen).
Considering a PSU factor of 0.8, the power consumption of an overclocked R5770 Hawk is around:
(210 – 100) * 0.8 = 88W
According the TDP database, we are below the TDP of a Radeon HD 5770: 108W.
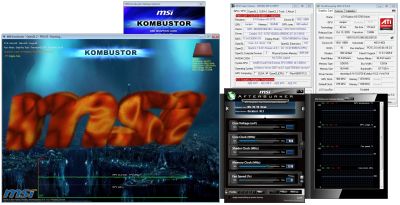
I ran Kombustor in stability test mode during 24 min with these settings without problem:
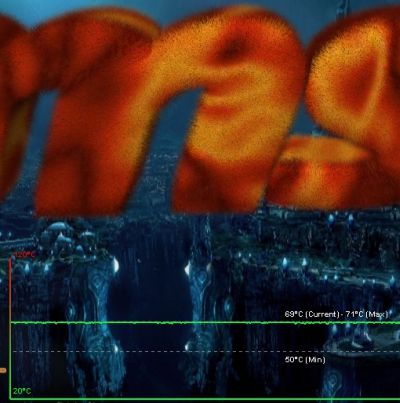
The temperature is stabilized at 69°C which is really nice.
Actually the temperature evolution is not natural: the curve is not a normal exponential function. We can easily see that something clamps the temperature at 69°C. The following image shows the temperature graph with default clocks:
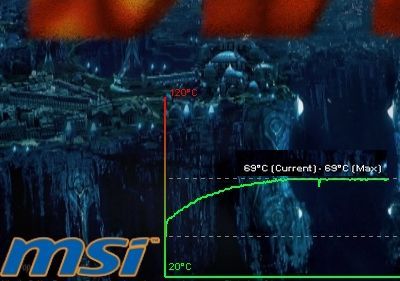
And even with overclocked clocks, the temperature doesn’t exceed 69°C. I think this is the hardware VRM monitor that does its job (see HERE for more details).
And what about Kombutor scores with these OC settings ?
1 – 1024×768: 3312 points – gain: +10%
2 – 1920×1080: 1637 point – gain: +9%
Considering that MSI’s R5770 is already factory overcloked, this is a nice gain in performance.
970MHz is the max clock you can have with a GPU voltage of 1.2V. For example, W1zzard (techPowerUp) reached 980MHz with 1.25V, and 1020MHz with 1.35V. Guru3D has reached 1050MHz with 1.3V. But all these settings are depending on the 3D test used to validate the overclocking. Kombustor, like FurMark, is very GPU demanding and is also graphics memory demanding. So with Kombustor is quite hard to reach the same OC settings than TPU or Guru3D. Another factor to take into account is the R5770 Hawk sample. Maybe the sample I have is not the best R5770 sample and its max clocks are limited.
Other MSI R5770 Hawk reviews
Pingback: Today’s Tech Reviews | PC Help Forum
to check for invisible artifacts, try occt..
i had my sapphire vapor-x hd 5770 @ 960mhz @ 1125 mV.. gave 7 errors.. at 1150 mV, 0 errors
occt works on cpu’s, (occt:cpu test)
it has a burn in feature (occt:linpack test)
a gpu test
and a 3d card memory test (for nvidia cards, its memtest86+ converted to cuda)
also a torture test for psu (loads linpack and gpu test to get the max wattage out of your psu..)
its a great tool since it sees artifacts that a human eye cannot see (eg 1 frame artifacts at 120 fps = invisible..)
try it, i bet you will love it
-mosibfu (i added the link to the website under the “website” thingy)
hey, thanks for the review.
the r5770 works for two weeks within my new system now, and i’ve spent some time to find the ideal overclocking settings.
what i didnt know is that ‘my’ timings are that impressive, so some people and this review told me. i am not sure about if i did something wrong while overclocking, maybe you can tell me.
settings so far:
gpu clock: 1025mhz
vram clock: 1300mhz
voltage: 1.200 volt (stock?)
i used newest afterburner and kombustor and found no errors. in addition 3dmark06, 3dmarkvantage, unigine 2.0, farcry2 bench and crysis bench went flawless too.
is 1.200V the stock voltage ???
need to check with RBE.
check detailed system specs:
http://www.sysprofile.de/id47105
regards,
filewalker
I just bought this card and I’m no tech savvy. I don’t know what half of this review is even talking about, all I want to know is what is the best overclocking settings for this card without a big increase in voltage. I have Intel Core 2 Duo 2.8GHz with 2GB RAM (it’s not a gaming computer). What’s the deal with that error you mentioned? Does that happen if I increase clock speed too much with increasing voltage? I’m too scared to increase the voltage more than 1.2V and even that might be too much. Could someone just give me some stable, light overclocking settings that won’t make the card overheat, my computer have that big error, or run a moderate risk of either of the former.
Thanks.
this card is excellent, My old 5770 went up to 85c on kombustor on STOCK SETTINGS!
anything BELOW 80c is a good overclock, in my book.
I cranked up the voltage to 1325 Ma, i wont go to the meax of 1350, as i never like going max on the voltage.
Core clock, ive pushed it to 1040MHz and Mememory clock to 1400 MHz.
Thats a 15% increase on the memory and a 22% increase on the clock.
All running with a nice stable 74c after 10min on kumbustor, although I do have a fan blowing directly on the card as well.
Fan speed is around 70% which is good as well.
Pingback: [TessMark] OpenGL 4 Tessellation Benchmark: Comparative Table - 3D Tech News, Pixel Hacking, Data Visualization and 3D Programming - Geeks3D.com
Pingback: [GPU Tool] ShaderToyMark: Extreme Pixel Shader Benchmark - 3D Tech News, Pixel Hacking, Data Visualization and 3D Programming - Geeks3D.com
Pingback: [Tested] ASUS ENGTX580 1536MB at Geeks3D Labs - 3D Tech News, Pixel Hacking, Data Visualization and 3D Programming - Geeks3D.com
Pingback: [Tested] SAPPHIRE Radeon HD 6870 1024MB Review - 3D Tech News, Pixel Hacking, Data Visualization and 3D Programming - Geeks3D.com
Pingback: [GPU Tool] ShaderToyMark 0.2.0 Demomakers’ Benchmark Available with Better SLI and CrossFire Support - 3D Tech News, Pixel Hacking, Data Visualization and 3D Programming - Geeks3D.com
Pingback: [Tested and Burned] SAPPHIRE Radeon HD 6970 2048MB Review - 3D Tech News, Pixel Hacking, Data Visualization and 3D Programming - Geeks3D.com
Pingback: [Tested] ASUS Radeon HD 6950 2GB GDDR5 Review - 3D Tech News, Pixel Hacking, Data Visualization and 3D Programming - Geeks3D.com
Pingback: [Tested and Burned] ASUS GeForce GTX 560 Ti DirectCU II TOP Review - 3D Tech News, Pixel Hacking, Data Visualization and 3D Programming - Geeks3D.com
Well my 5770 HAWK GPU overclocks to 1000MHz with no voltage tweaking (Only when I switch on the air conditioner, but that’s stable).
Hi every one I wanna buy this card but will it run on Corsir HX650 [650watt psu]